
Physiology News Magazine

3D Printing Primer for Physiologists
3D printing is about to revolutionise the medical world – from printing realistic surgical models, stents, prostethics, to heart valves, bones or ear cartilage. Physiologist Christof Schwiening recounts his own experiences with 3D printing.
Features
3D Printing Primer for Physiologists
3D printing is about to revolutionise the medical world – from printing realistic surgical models, stents, prostethics, to heart valves, bones or ear cartilage. Physiologist Christof Schwiening recounts his own experiences with 3D printing.
Features
Christof Schwiening,
University of Cambridge, UK
https://doi.org/10.36866/pn.101.24
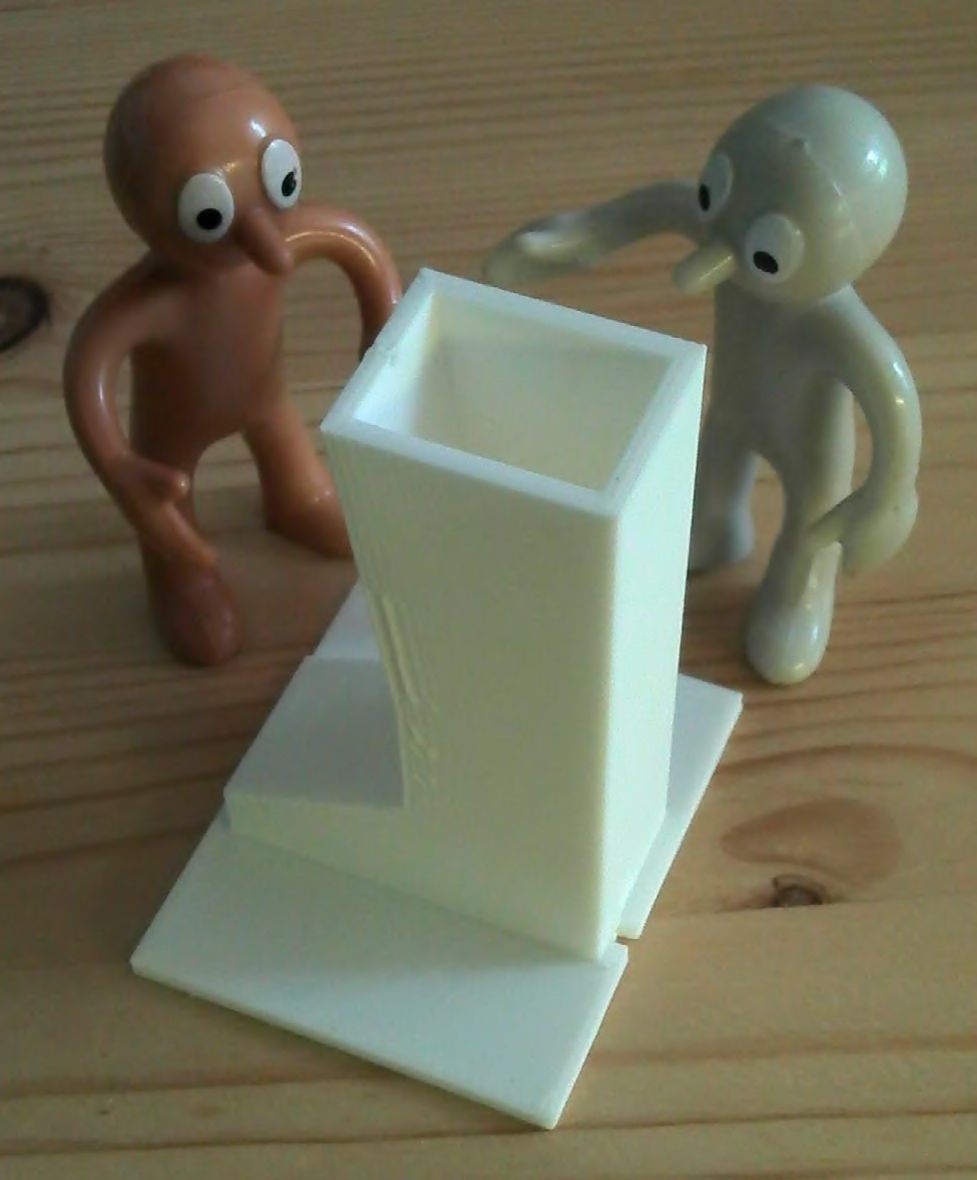
Printing objects out of plastic has become relatively easy in the past couple of years with the development of consumer-level filament deposition technologies – essentially using a computer controlled print head to squirt hot plastic onto a level bed. The ‘Boot’ (Fig. 1) was my first 3D print – and had no function other than to allow me to discuss some unusual ideas with colleagues in the coffee room. But 3D printers have myriad usages for physiologists, below I have discussed the why, how and the wow of current 3D printing technologies.

Once I had only a tendency to accumulate bits of old kit, but the closure of our mechanical workshops about 10 years ago turned me into an obsessive hoarder. Modifying a superfusion system, changing the mounting of electrodes, attaching a keyboard in an accessible location or protecting bits of electronics from Ringer’s solution requires a good supply of bars, bolts, tubes, washers, clamps, nuts, Perspex and a mass of Silicone rubber, plasticine or Blu-Tack. Often no suitable commercial solution is available and without access to a friendly skilled workshop the Blu Tack ends up becoming a permanent feature which all too often sags and then eventually fails. With the workshop gone I was increasingly forced to use my own workshop at home. Of course there were other workshops around the University but the turn-around times were long, and iterative redesigns were simply impossible since each version required remaking from scratch.
I had heard about 3D printers in the news but had always assumed they were expensive toys of limited real world use. I began to pay a bit more attention in 2012 when Hugh Matthews decided to produce a new first year practical and needed to make 40 strain-gauge mounts to fit between the students’ fingers.
To make the mounts he first bought a box of rods, motors, clamps and some control electronics from RepRapPro. When assembled, the box of bits formed a 3D printer called a Mendel. The concept behind this form of 3D printing – fused deposition modelling (FDM) – is not radically different from forming a coil pot with clay. A heated (200-250°C) print-head has plastic filament (~1.75 mm diameter) fed through it out of a fine nozzle (0.3-0.5 mm), as it is made to scan across a bed with the print-head lifting a little (~0.3 mm) as each layer is completed. Thus an object can be, literally, drawn into existence.
My enthusiasm for this technology was ignited whilst making an automated fly-tapper for a colleague from some 1950s Swedish Mechano (FAC X2). I had all the necessary gearing, posts, plates and a motor, but I could not find a way of mounting the tube of flies on the end of a lever arm. I was, frankly, beginning to look a bit stupid when another colleague appeared (Kevin O’Holleran, Cambridge Advance Imaging Centre, CAIC), and hearing of my problem suggested ‘let me just print you something’. Within 30 minutes, he had a design and his MakerBot (a commercial 3D printer) began buzzing into life.
The actual print took about 1 hour but what he delivered was almost exactly what I wanted. It seem churlish to criticise the design, after all it worked reasonably well – but, I did – which resulted in him returning a short time later with the perfect 3D printed piece of plastic. I was amazed, this really was a rapid prototyping process.
It was only a brief time before I managed to persuade my son that he wanted a 3D printer kit for his 17th birthday; at that point I could not see quite how I could justify one for the lab. Had my wife known the true cost of the printer, Max may well have ended up with a replacement phone instead.
Building a 3D printer is not entirely a trivial task. Max and I slaved over the construction for many evenings before we had it functioning. But, it is not impossibly difficult as Jessica Chadwick (a second year physiology student from Leeds) showed this summer, when she assembled one in my lab. I hope she won’t mind me saying this, but it can be done by someone with no engineering or DIY background, requiring nothing but a bright mind and an ability to follow online instructions. Assembled ‘ready-to-go’ 3D printers are relatively cheap and an easy option. But, the process of FDM is a bit of an art and the purists claim that true empathy for the dynamics of molten plastic can only be attained by building the machine from scratch!
Often the easiest way to exploit 3D printing is to make friends with someone who already has one – or find the nearest workshop using them. The big advantage to FDM is that manufacture occurs from a design produced on a computer and involves just a machine with no complex drilling, milling or machining. Once a design has been made, tweaks to angles and dimensions are easy and a new object can be printed. Thus, once one has mastered the art of computer aided design (CAD) almost anything is possible. Access to a cheap printer allows for rapid prototyping before, if necessary, emailing the final design to a high quality industrial machine. The cost of printing is, almost, negligible: in terms of raw material, perhaps £30 per kilogram of printed object – and most of the objects here weigh less than a tenth of that. The cost is most accurately reflected by the investment of time in learning how to design functional objects. It is a skill, once acquired, that is easily refined through practice.
The design process does require some knowledge of what FDM printers can and can’t do. Typically overhangs (unsupported areas), tall thin structures or bridging elements are problematic. But, there are also designs that could not be manufactured in any other fashion than 3D printing (see the incredible 3D printed microscope in Fig 3). Creating complex internal structures within an object is no problem and something that cannot be achieved by machining techniques or even competing plastic technologies such as injection moulding. This allows objects that might otherwise have to be screwed together of constructed from multiple pieces to be made in one go. The cost and time savings of such a technology are obvious.
There are many ways of creating the designs. Purists with a mathematical or computing background often favour open source 3D programming languages (like OpenSCAD) which allow specified simple objects to be fused together, scaled, rotated and to be cut by other objects. For people used to a ‘what you see is what you get’ approach programs like FreeCAD, Autodesk Inventor (my current program of choice free within the educational sector) or even SketchUp are more easily accessed. They allow 2D drawings to be extruded into 3D objects. It is a simple process which can build to produce a complex object with the 2D designs being drawn on any face of a 3D object before being extruded to give that drawing depth. Dimensions (linear or angular) can be specified and modified at a later stage.
Once an object has been designed a couple of file conversion steps are required to turn it into the code (typically G-code) that instructs the printer. Often the process involves saving the object as an STL file – an industry standard file type that specifies 3D objects – before being sliced (using freeware such as Slic3r) into layers with appropriate controls for the specific printer.

Once mastered – and I have several 3rd year degree students designing objects to be printed on my printers – the opportunities are almost endless. A variety of plastic filament types exist with varying properties. PLA (polylactic acid) is often used by beginners because of its low melting point and ease of use (and when printed it smells like chips cooking). But, ABS (acrylonitrile butadiene styrene) has superior heat resistance and can be fused and smoothed by acetone resulting in vastly stronger objects as the layers of deposited plastic are melted more completely together. Nylon and a range of elastic filaments now exist, although I have yet to use them in anger. The colours available are endless from the light absorbing blacks to transparent filaments – pink, red, blue, fluorescent, sparkling are all available. Indeed, many printers now work with multiple colours or different types of filaments (such as dissolvable ones) to produce overhangs that would otherwise be impossible.

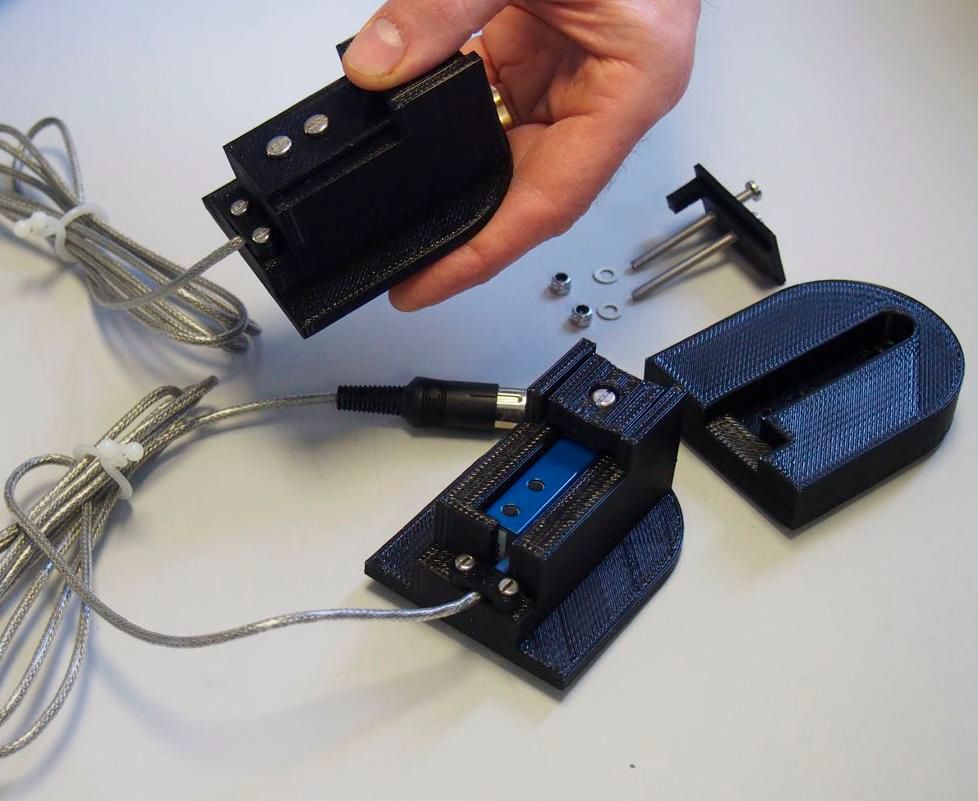
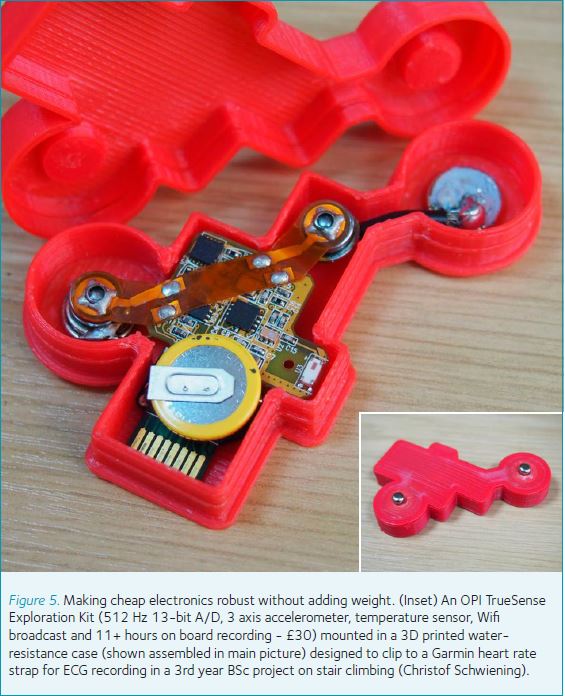
For me, the ability to execute a rapid prototyping loop (design, print, test, redesign, reprint, retest etc – sometimes with the whole assembly modelled, see Fig. 4) where the quality of the final object is not limited by traditional workshop skills is revolutionary (e.g. Fig. 5, a lightweight case that holds a complex piece of electronics perfectly in place). Of course my drawers are still full of bits of old kit, but now their value has been multiplied ten times. If I can find an appropriate motor, producing a functional mount for it is trivial. If I need a seal, I can make the right sized lid for an O-ring that I already have. Thus, almost all of my ‘junk’ is suddenly dimensionally correct because I can design and specify what it connects to.
How to get started in 3D printing
My advice is not to jump straight in and buy a 3D printer – unless you are a technically-minded geek. The time investment is considerable. Whilst a DIY machine can be assembled in 10-20 hours you should expect things to go wrong and be willing to troubleshoot. Even an off-the-shelf machine will require some maintenance and tweaking. Instead, my advice is to find someone with a 3D printer and ruthlessly exploit them! With any luck they will be more than happy to design something for you and print it out. But more importantly, they might also sit with you during the design process so you can see the software in action. It is then only a matter of downloading the software for yourself and attempting a few tutorials. One of my third year physiology students was designing and printing objects on my RepRapPro Ormerod 2 whilst I was away teaching, having had just a single hour of demonstration. Most Universities will now have central facilities for some form of 3D printing using a range of machines. Often these will be capable of producing objects at higher resolution and tolerance than consumer devices and from more durable materials. Prototyping using cheap FDM printers is often just a first step towards the printing of a commercial-grade object.
What use is a 3D printer to me?
Typically the world of 3D printing designs (e.g. www.thingiverse.com) is full of designs for parts to ‘improve’ existing 3D printers – indeed, the simpler structural elements of many DIY printers are printed by other 3D printers (they are to some extent self-replicating). But, the range of possibilities is almost endless whether you are a scientist looking to solve relatively trivial problems such as housing filters or electronics an educator rolling out a new practical, engaged in cutting edge manufacturing or attempting to engage prospective students (Fig. 7).


3D printing technologies
FDM printers
These extrude melted plastic in layers, are by far the most common consumer-level 3D printer. A very basic model capable of small prints in PLA costs about £250 for a self-assembly kit (e.g. Fisher Delta, RepRapPro) or £1,000 for an assembled model (Makerbot Replicator Mini, RS). Spending a bit more money is worthwhile since it buys larger print areas, heated beds (necessary for some plastics like ABS that have high thermal expansion coefficients), multiple print heads and designs that are either more compact or robust. For those interested in DIY options, printers produced by RepRapPro are a good option with a strong emphasis on Open Source designs and a lively community of enthusiasts. For off-the-shelf solutions RS stocks a wide range of models.
Stereolithography
(SLA) printers use a UV laser to selectively cure resin within a bath – it was one of the first 3D printing techniques. SLA printers tend to be more expensive to buy and run (the liquid resin being troublesome); however, they can produce high-resolution designs with speed. In particular the newer generation digital light projection (DLP) printers which cure plastic by projecting a UV image of each layer on the resin can produce objects very quickly and at very high resolution.
Material jetting printers
These printers use a moving print head to squirt the substrate into place. They come in many different forms with a range of substrates ranging from chocolate to metal. Indeed bio-printing is possible with living cells being deposited to form 3D organs.
Selective laser sintering
This is a process where a laser is used to fuse particles within a powder together, the advantage here is that objects can be made from glass, ceramic or metal. The high-power laser required tends to make such machines rather expensive.